Tired of (not) using my Raspberry Pi as a boring mediacenter, I decided to transform it into an useless useful garage door remote controller.
The purpouse is to use my Nexus 5 and LG G Watch as a remote control for opening/closing my garage door: not for ease of use compared to classic remote, but (as many geek projects) just for the fun of it.

Since I’m not an engineer, I preferred to not directly connect Pi to the opener engine, but just to the remote:
Nexus 5 –> Raspberry –> Remote –> Door
Protocol used is Blueetooth (not Wi-Fi) mainly for 2 reasons:
- Avoid to accidentally open the garage door when I’m not near it
- No need to depend on external devices or services (router, internet…)
This guide is not intended for beginners, I assume you are a developer and know how to use Linux.
Changes
- 2015-08-07: Version 2 of Abraboxabra server supports add/remove remotes. Server code updated to v2, requires additional file abraboxabra-agent.py and v2 app.
- 2015-07-06: Initial release
Disclaimer
This project expones you to potentially hazards in working with electrical parts, like burn or electric shocks.
If not confident with elettricity, ask someone qualified to help you.
I’m not responsible of any kind damage, to persons, things or unicorns.

What is needed
- A working Raspberry Pi (really? :)), available also on Amazon, with power line adapter and SD card
- Relay compatible with Pi, like this
- Female to female breadboard jumper cable wires, like these
- Bluetooth dongle compatible with Pi, choose your preferred
- A spare remote control garage door opener
The power of Choice
There are many Pi distributions available on the net, but the most used ones are Raspbian (a Debian derivate) and Pidora (a Fedora one).
As far as I noticed, Raspbian is more supported, better documented and easy to configure, so I initially decided to choose it. After some day of playing with it, I noticed (like many users), that an unknown bug causes Pi to freeze after about 2-3 days of uptime: not very convenient for a garage door opener 🙂
After some useless tries to figure out what was causing the issue, I decided to give up and try Pidora, which luckly doesn’t seem to suffer the same strange behaviour.
Since I started writing this tutorial before discover the bug, I decided to post them both guides, because you could be luckier than me.
Blue pill or Red pill: your choice.

Installing and configuring Raspbian
Head to http://www.raspberrypi.org/downloads/ and download latest Raspbian image, then install using these instructions.
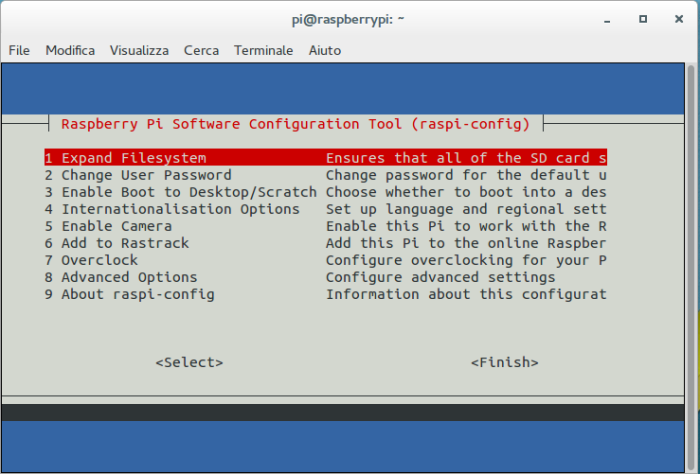
Once booted up we need to configure and update the system (login with pi/raspberry):
sudo raspi-config
sudo apt-get update
sudo apt-get upgrade

A reboot is not needed but suggested. Plug your Bluetooth dongle and type:
sudo reboot
Tip: want to assign a static ethernet ip address so you can directly connect Raspberry with your pc?
Add “ip=xxx.xxx.xxx.xxx” at the end of boot/cmdline.txt (note: do not add a newline!). This is mine:
dwc_otg.lpm_enable=0 console=ttyAMA0,115200 console=tty1 root=/dev/mmcblk0p2 rootfstype=ext4 elevator=deadline rootwait ip=169.254.63.240
Configuring Bluetooth on Raspbian
Install Bluetooth tools we need:
sudo apt-get install bluez python-bluez python-gobject python-psutil python-rpi.gpio
Disable pnat because a bug stops normal operations:
sudo vi /etc/bluetooth/main.conf
Add this line:
DisablePlugins = pnat

Restart Bluetooth service:
sudo service bluetooth restart
If everything has been successful you should be able to get information about the installed Bluetooth dongle (in particular your BD address) with this command
sudo hciconfig
To make the device discoverable you also need to type:
sudo hciconfig hci0 piscan

Now your smartphone should detected (but not pair) our Pi, congratulations!

Optional, but suggested, you can use hciconfig to change your Bluetooth dongle name:
sudo hciconfig hci0 name "yourFavouriteServerName"
Pairing using bluez simple agent
Included in python-bluez there is bluez-simple-agent, used to pair interactively with other devices.
Executing it, you’ll see the agent being registered
root@raspberrypi:/home/pi# bluez-simple-agent
Agent registered
From your smartphone, enable Bluetooth scanning, and click to pair with the server.
The server pairing part is done typing on keyboard the pin you set on smartphone:
RequestPinCode (/org/bluez/3850/hci0/dev_BC_F5_AC_4A_62_97)
Enter PIN Code:
Making everything available after a reboot
Add to the /etc/rc.local file, before the “exit 0” these lines:
hciconfig hci0 piscan
hciconfig hci0 name "Abraboxabra"
nohup python /root/abraboxabra.py &
We will discuss the last line later.
Jump here to do finish setup.
Installing and configuring Pidora
Head to http://pidora.ca and download latest Pidora image, then install using these instructions.
Please note before booting first time: there are 2 boot modes: normal and headless:
- normal: used if you have mouse, keyboard and display conncted to your Pi. During the first boot a wizard will be shown to configure network, resize the SD and other thingies
- headless: used if you want to run Pidora with nothing attached into. All startup configurations will be made using a file, to put on SD Card before booting, explained below:
For headless first setup, create a file named “headless” in BOOT partition of the fresh installed SD card. Add these 2 lines:
RESIZE
SWAP=1024
The RESIZE line tells the installer to expand the rootfs for all the SD card (the standard copied image is about 2.2GB but the space available is not enough for our purpouse).
The SWAP line tells to use a swap file of 1024MB (make sure your card has available megabytes).
If you want an IP given from DHCP, then no other changes are needed, otherwise you must supply 3 lines (all 3 are mandatory): ip, netmask and gateway, like this example:
IPADDR=192.168.1.105
NETMASK=255.255.255.0
GATEWAY=192.168.1.1
Please note: first boot may be slow due to the expanding process.
(If you need to expand the filestem manually, follow this guide.)
Once boot process is over, ssh to the Raspberry with root/raspberrypi credentials and install the needed software:
yum update
yum install net-tools bluez pybluez python-rpi-gpio python-psutil
If you don’t need X you can remove with
yum remove xorg-x11*
Reboot the system.
Configuring Bluetooth on Pidora
Start the Bluetooth interface (which off by default):
hciconfig hci0 up
To start Bluetooth interface on every boot, create the file /etc/udev/rules.d/10-local.rules and add these lines:
# Set bluetooth power up
ACTION=="add", KERNEL=="hci0", RUN+="/usr/bin/hciconfig hci0 up"
Start discoverability:
hciconfig hci0 piscan
Try to discover bt devices from your smartphone:
First step, done.
Now we need to enable the Bluetooth service to complete setup:
[root@pidora ~]# systemctl enable bluetooth.service
 ln -s '/usr/lib/systemd/system/bluetooth.service' '/etc/systemd/system/dbus-org.bluez.service'
 ln -s '/usr/lib/systemd/system/bluetooth.service' '/etc/systemd/system/bluetooth.target.wants/bluetooth.service'
Start Bluetooth service:
service bluetooth start
If it gives an error like “Failed to issue method call: Unit bluetooth.service is masked.” we need to unmask it:
systemctl unmask bluetooth.service
Then again:
service bluetooth start
Optional, but suggested, you can use hciconfig to change your Bluetooth dongle name:
hciconfig hci0 name "yourFavouriteName"
Pairing
On Pidora pairing device is done using the bluetoothctl utility, and it is needed only once for each device:
[root@pidora ~]# bluetoothctl
[NEW] Controller 00:11:22:98:76:54 Abraboxabra [default]
Make device both discoverable
[bluetooth]# discoverable on
Changing discoverable on succeeded
…and pairable
[bluetooth]# pairable on
Changing pairable on succeeded
Start the agent:
[bluetooth]# agent on
Agent registered
Start Bluetooth on your smartphone, get its address (Settings –> About Phone –> Status –> Bluetooth address or use scan on / scan off commands), make it discoverable, then start pairing from Pidora:
[bluetooth]# pair BC:F5:AC:4A:62:97
Attempting to pair with BC:F5:AC:4A:62:97
[CHG] Device BC:F5:AC:4A:62:97 Connected: yes
Complete the pairing process…
Request PIN code
[agent] Enter PIN code: 1234
[CHG] Device BC:F5:AC:4A:62:97 Modalias: bluetooth:v000Fp1200d1436
[CHG] Device BC:F5:AC:4A:62:97 UUIDs:
        00001105-0000-1000-8000-00805f9b34fb
        0000110a-0000-1000-8000-00805f9b34fb
        0000110c-0000-1000-8000-00805f9b34fb
        0000110e-0000-1000-8000-00805f9b34fb
        00001112-0000-1000-8000-00805f9b34fb
        00001115-0000-1000-8000-00805f9b34fb
        00001116-0000-1000-8000-00805f9b34fb
        0000111f-0000-1000-8000-00805f9b34fb
        0000112f-0000-1000-8000-00805f9b34fb
        00001132-0000-1000-8000-00805f9b34fb
        00001200-0000-1000-8000-00805f9b34fb
        00001800-0000-1000-8000-00805f9b34fb
        00001801-0000-1000-8000-00805f9b34fb
[CHG] Device BC:F5:AC:4A:62:97 Paired: yes
Pairing successful
…then quit
[bluetooth]# quit
[DEL] Controller 00:11:22:98:76:54 Abraboxabra [default]
Congratulations!
This screenshot shows the above process, plus some other useful command (typing help will show all available commands):

Alternate pairing method using bluez simple agent
Some devices don’t pair using bluetoothctl (for example my LG G Watch), so I had to use bluez’s simple-agent, not available in bluez Pidora package.
Download simple-agent.py from here, then execute the pairing:
[root@pidora ~]# python simple-agent.py
Agent registered
Now from your phone, request a pairing to Abraboxabra. You’ll see on terminal an output like the following, asking for a PIN to complete pairing:
RequestPinCode (/org/bluez/hci0/dev_AC_9E_17_26_F1_36)
Enter PIN Code: 1234
Making everything available after a reboot
Create the /etc/rc.d/rc.local and add these lines:
#!/bin/bash
hciconfig hci0 piscan
hciconfig hci0 name "Abraboxabra"
nohup python /root/abraboxabra.py &
We will discuss the last line later.
Make it executable:
chmod +x /etc/rc.d/rc.local
Hardware connections – relay
Raspberry and the relay need to be connected like the schema below. I’ll use GPIO7 port.
This scheme should be valid for all Raspberry Pi models, including RPi2. Refere to this article, this and this if you want to change the GPIO port to use, as the order slightly changes over hardware revisions.

To test if GPIO connections are working, just start Python and type:
[root@pidora ~]# python
Python 2.7.5 (default, Jul 18 2014, 10:05:59)
[GCC 4.8.2 20131212 (Red Hat 4.8.2-8)] on linux2
Type "help", "copyright", "credits" or "license" for more information.
>>> import RPi.GPIO as GPIO
>>> GPIO.setmode(GPIO.BOARD)
>>> GPIO.setup(7, GPIO.OUT)
>>> GPIO.output(7,False)
>>> GPIO.output(7,True)
>>> (press CTRL-D to exit)
When calling GPIO.output(7,False) the red led of the relay should light on, indicating the circuit is closed.
On some GPIO library, GPIO.setup close the circuit, so you should see the light on just after that command. It is an annoying behaviour not suitable for our server. I did a workaround for it.
Hardware connections – remote control
This depend on how your remote control is built. The key is to find the 2 point to solder, under the switch button.
This is my remote, which has 2 buttons:

I choose to use the first button, near te red led.
I flipped the remote and located the 2 point to solder to 2 little (10cm) wires:

Last thing is to plug the wires in port NO2 and COM2 of the relay. This is the final result:

Executing the Python script again, should finally control the remote 🙂
Writing the Bluetooth server
The server just consists in a program than only accepts a “openclose” command.
Once the command is received, it simulate a button press of one second on the remote, very simple.
Create it on the root home directory, named abraboxabra.py (or whatever you want).
This is the source code of a simple server, you can download a more complete version from here.
As of 2015-08-07, Abraboxabra v2 requires abraboxabra-agent.py to be able to add and remove new remotes directly from app.
# Abraboxabra 1.0
# Author: Piero (scognito@gmail.com)

import time
import RPi.GPIO as GPIO
from bluetooth import *

GPIO.setmode(GPIO.BOARD)

#Commented as GPIO.setup close the circuit. Will use a workaround
#GPIO.setup(7, GPIO.OUT)

#workaround
first_time = True

server_sock=BluetoothSocket( RFCOMM )
server_sock.bind(("",PORT_ANY))
server_sock.listen(1)

port = server_sock.getsockname()[1]

uuid = "94f39d29-7d6d-437d-973b-fba39e49d4ee"

advertise_service( server_sock, "SampleServer",
                   service_id = uuid,
                   service_classes = [ uuid, SERIAL_PORT_CLASS ],
                   profiles = [ SERIAL_PORT_PROFILE ],
#                   protocols = [ OBEX_UUID ]
                  )

print "Waiting for connection on RFCOMM channel %d" % port

client_sock, client_info = server_sock.accept()
print "Accepted Bluetooth connection from ", client_info

while True:
   try:
        data = client_sock.recv(1024)
        print "received command [%s]" % data
        if data == 'openclose':
                if first_time:
                        GPIO.setup(7, GPIO.OUT)
                        first_time = False

                # simulate pressing button for 1 second
                GPIO.output(7,False)
                time.sleep(1)
                GPIO.output(7,True)
                client_sock.send("OK")

   except IOError:
      client_sock, client_info = server_sock.accept()
      print "Accepted Bluetooth connection from ", client_info
      pass

print "disconnected"

time.sleep(1)
GPIO.output(7,True)

client_sock.close()
server_sock.close()
print "All done, have a nice day :)"
Just test with:
[root@pidora ~]# python abraboxabra.py
If server does not start on Pidora, showing this error:
[root@pidora ~]# python abraboxabra.py
Traceback (most recent call last):
  File "abraboxabra.py", line 39, in
    profiles = [ SERIAL_PORT_PROFILE ],
  File "/usr/lib/python2.7/site-packages/bluetooth/bluez.py", line 176, in advertise_service
    raise BluetoothError (str (e))
We need to modify /usr/lib/systemd/system/bluetooth.service adding –compat in line ExecStart=/usr/libexec/bluetooth/bluetoothd
#ExecStart=/usr/libexec/bluetooth/bluetoothd
ExecStart=/usr/libexec/bluetooth/bluetoothd --compat
and restart bluetooth service:
service bluetooth restart
Fix from here.
Packing togheter and mounting
The best thing to do is to put everything in a small box, to preserve components from dust. This is a prototype used for testing:


Once sure it works, it’s safe to use a a fireproof box and mount definitively:


Android app
I made an app for controlling Abraboxabra available on Google Play Store, sources are freely available.
You need to pair at least a smartphone before releasing the server.
Abraboxabra v2 make adding and removing new remotes easy within the app itself (throught menu).

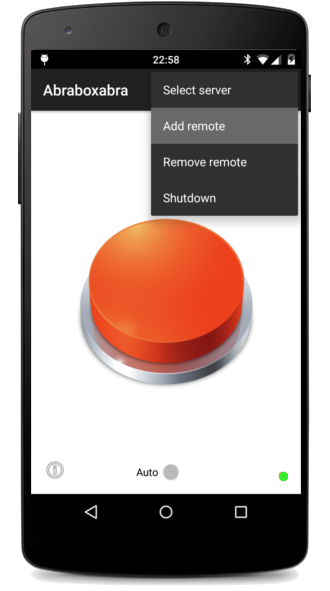

Icon description
- “wrench” icon (on smartwatch): select the server to connect
- “auto” icon: if selected, the open/close command is sent at every app startup
- “i”: show debug info
Led icon status:
- Green: correctly connected to server
- Red: not connected to server
- Yellow: connecting to server

Next steps
This project is nothing more than a proof o concept. Some features needs to be added to make it more useful, like the ability to configure new remotes directly from the app, or change server configuration (eg. button press delay, authorized devices…).
Happy hacking!


Hello, you use python 2 or 3 to the agent?
"Mi piace""Mi piace"
I don’t remember…but I guess it is Python 2.
Shouldn’t be relevant which version you want to use
"Mi piace""Mi piace"
Hello Scognito. I´m trying to reproduce your amazing work but i´m having a lot of problems… I´m using a Raspberry zero W with the last version of Raspbian. Can you update the tutorial for this version or give some clues for it? Thanks for your help!
"Mi piace""Mi piace"
Hi Hèctor,
what kind of problems? I guess lot of things are changed on raspberry world since I wrote the article.
Consider this tutorial as guidelines, if you are familiar with Linux you shouldn’t have many problems.
Just ask here maybe I can help, but the only raspberry I have is the one still running on garage door so I can’t make tests 🙂
"Mi piace""Mi piace"
Hi!
This the error that I have when execute abraboxabra.py:
sudo python abraboxabra.py
found!
inizio! password = 0000
Traceback (most recent call last):
File “abraboxabra.py”, line 146, in
profiles = [ SERIAL_PORT_PROFILE ],
File “/usr/lib/python2.7/dist-packages/bluetooth/bluez.py”, line 176, in advertise_service
raise BluetoothError (str (e))
bluetooth.btcommon.BluetoothError: (2, ‘No such file or directory’)
"Mi piace""Mi piace"
Hi Scognito!
Just with some touching in the python program I have everything already working. Thanks for your help!
"Mi piace""Mi piace"